- Traveling with Armor Today (Part 1)
- Traveling with Armor Today (Part 2)
- Traveling with Armor Today (Part 3): Paperwork
- Traveling with Armor Today (Part 4): Packing
(If you haven’t seen it yet, this series begins with Part 1 over here.)
Getting Your Paperwork in Order
OK, now, your flight is all set, you’ve got transportation at your destination, and you’ve got a place to stay. Let’s talk about what kind of paperwork you’ll need.
Itinerary
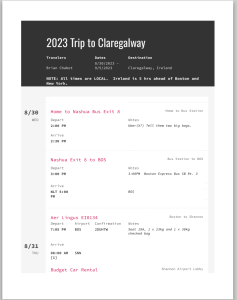
It sounds old fashioned, but open your word processor or spreadsheet and write out your complete itinerary from the time you leave your home to the time you return to your home. Seriously. (I use Google Sheets. Select New Spreadsheet, then From Template, and look for “travel planner”. You’re welcome.)
There are three main reasons to do this:
- To give to a trusted person back home for safety. (In case you need to be located in an emergency, or if you go missing, they can give this to the police. )
- To show to an over-zealous immigration official if they get nosy and ask for details. Having them at hand will save you time and mistakes.
- To act as a check list to make sure YOU haven’t forgotten to do anything… It also acts as a sanity check.

The format is up to you, but I tend to use something like this: I put the Date and Time of each item on the far left column. In the main column, I include all the details: companies, contact info, addresses, Duration times, confirmation numbers, etc. You can bold, highlight, or color code it however you like.
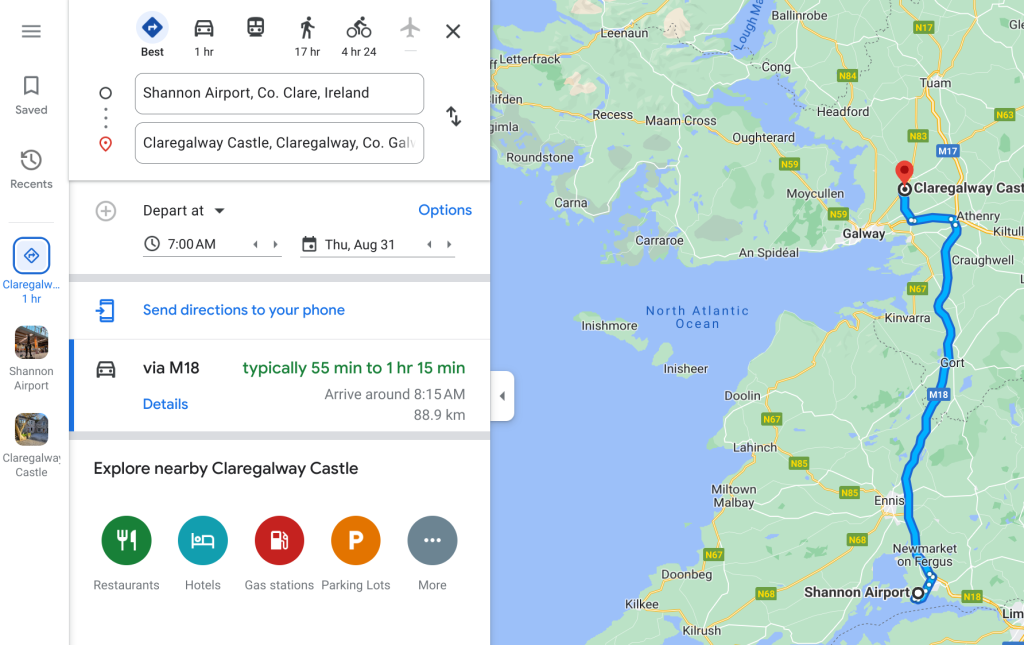
Now open Google Maps again. For each time you’ll need to move from one place to another. Look up the starting point and then get directions to the ending point. Note the mileage and estimated time. Now add the destination. Click on the “L:eave Now” setting and change that to show the time constraints you might have. For instance, plane arrives at 6am? Give yourself an hour to get your bags and car and set that as the “Depart at” time. For example, here’s my directions from Shannon Airport to Claregalway Castle:

Here, you can see the best route and also that the castle is only an hour from the airport. If I put the right details into the itinerary, I’d see that the hotel (right next to the castle) won’t let me check in till 3pm, so that means I need to kill some time. Maybe I will add a stop in the area for sight seeing. Google Maps can also help here. For each travel segment, copy that huuuuuge address from your Google Maps directions and create a link in your itinerary or alternately link the Google Maps link to the location to each place you’ll be. Then when you’re there and need to go, you can bring up your itinerary on your phone and click on the link for directions.
Go through the itinerary often and fill in any missing info. This tends to be my main document in planning my trips. Of course, you don’t need to plan for every second of your trip. Remember to leave time to explore and have some fun.
Insurance
“But health care is freeeeee there!” Well… yes. Free because of taxes or rather affordable. But…. if something major happens you’ll be happy you got the extra health coverage when you want to go home and you can’t walk. Get the travel health package. I use GeoBlue. (No affiliation.)
Make sure you also have your auto insurance. The car rental agency might need to see it.
Do you need travel insurance? Hopefully not, but I like to have it in case anything goes all pear shaped. If you can budget it, you’ll enjoy the peace of mind. If not, remember that you’re unlikely to need it unless something major happens… I know I was happy to have had it for my ticket to IMCF World Championships in 2020 when the whole thing (and everything else in the world) got cancelled because of the COVID outbreak.
Passports & Visas
You’re likely going to need a passport to visit most countries. (Yes, Americans don’t need one for domestic travel if you have a “RealID” drivers license and Canada and Mexico have their special cards.) Get a passport any way if you intend to travel by plane or anywhere outside your home country. If you don’t have one the time to apply is NOW, not a week before you leave.
Do you need a visa? The time to find out is as early as possible and check back regularly. You can check here but also double check with the national government website of your destination to verify. Many countries will allow US Citizens at least 90 days entry for tourism. If you need to apply for a visa, do it as soon as you can. The approval might take a while.
Event Schedule (and Invitation Letter)
It is a good idea to print out the official event schedule before you leave, and for the same reasons as making an itinerary. This will help verify your participation in the event and it’ll be a handy guide while you’re there.
If the event has sent you an invitation letter, print that as well. This is also for overzealous immigration officials.
Packing Checklists
And lastly, write down your packing checklists.
These should be in two forms: One for packing, and one, clearly printed, to stuff into your luggage listing everything inside in case Customs insists on opening it and checking. The checklist will help insure Customs understands what they’re seeing and nothing goes missing when a Customs official “loses” your new arming sword while re-packing.
So start with a scratch pad and write down everything you can think of that you’ll need. Add to this as you go about packing, but don’t seal any luggage yet. Once you’ve gathered everything, get your luggage scale out and as you pack make sure your bags are not over the allowed weight for the flights you’ve booked.
I’ll go into more detail about how to pack in the next part, but make a list. If you want to be really fancy, create a packing list spreadsheet, noting what, where it gets packed, weight (especially for armor parts), identifying characteristics, and lastly a column for “Packed?”. Sort by location and print that section to include in your bag. You may need to revise this for your return trip.
If you’d like me to make a spreadsheet template for this, please let me know in the comments!
Gathering your Paperwork
I like to keep my paperwork in two places: Anything that is a card or ID goes in an RFID shielded passport case and all the rest goes in the side pocket of my laptop bag. I have a habit of keeping my passport case in a breast pocket either in my shirt (yes, it makes me look like a nerd) or in my jacket. That way I can get to it even when I am strapped into my seat on the plane. Every document is also stored on my Google Drive in a special folder for that trip. You are unlikely to NEED all of it, but you’ll be happy if you do.
Here’s a handy travel paperwork checklist for you: (Items in italics go in an RFID shielded pouch. Everything else goes in your “personal item”.
- Passport (and visa if needed)
- Drivers License
- Auto Insurance card
- Medical Insurance card and supplemental medical insurance proof
- About $300 cash
- Itinerary (first copy)
- Itinerary (second copy)
- Event Schedule
- Event Invitation Letter
- Additional insurance paperwork
- Packing Lists
- Any other info you feel might be useful.
When you leave you should have these printouts and also an electronic copy somewhere in the cloud as a back up.
