- On Arming Points and Knots
- Re-furbishing an Arming Sword Grip
- The Perils of New Armor
- Some Thoughts on Armor Selection
- Managing Heat While Wearing an Oven
- Diet
- Train Like a 15th Century Knight
- Alternative Workout….
- Helmet time
- Injuries are real…ly annoying.
- Rust Prevention for Armor – Revisited
- How to Wear Leg Armor
What are arming points?
Arming points are the laces or ties that attach pieces of armor to your arming garments or to other pieces of armor. They function in a way similar to points and laces used in regular clothing of the middle ages and renaissance. In archaic English, a “point” referred to both or either, the location where the cord attached to the garment or the string itself. The act of pointing refers to making the attachment or tying the pieces together with a knot.
In modern armored combat, these seem to pose a challenge to a lot of fighters as we don’t normally tie our clothes together with laces. As a result, you see a couple creative solutions. Historically, though, they were very common so few people wrote much about them. One fifteenth century armor facebook group had a discussion of them here.
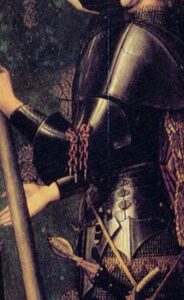
Historical Types of Arming Points
In examples from paintings, efficies, and illuminations, we see arming points made for decoration and also for utilitarian purposes. We see both braided and twisted cord and also leather thongs sometimes covered in cloth.
In the mid-fifteenth century essay on “How a Man Shall be Armed” (Morgan Library, MS M.775 ff122v-123v), arming points are described in detail as being made of fine cord, such as that used for crossbow strings, then pulled through shoemakers’ wax and tipped with metal aglets. The essay mentions that these points should neither break easily nor stretch. (Note that shoemakers’ wax usually contained very little actual wax. It is traditionally made with resin, rosin, pitch, tar, and a little wax. It softens when warmed and hardens to a sticky or solid condition at room temperature. It is meant to hold the fibers of a thread together when sewing and preserve the thread and knots in place on the finished shoe.)
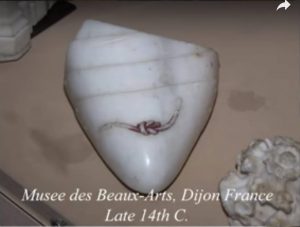
The essay doesn’t say whether the raw fibers should be twisted or braided. A 14th century effigy in France shows a clearly twisted point on a sabaton, tied in a correct “square knot” or “reef knot”. (See image.) Later paintings, especially in the 16th and 17th centuries show decorative points which are more commonly braided.
Braided points seem to be either flat like modern sports shoelaces or either round or square. They can be a single color or made of different color threads for decoration. Lucet braided cords are well known since the Viking period and finger braided cords from at least the 13th century. Both are well known in the 14th and 15th centuries, though the method of finger loop braiding seems to have been the most common. Medieval women are seen in several illustrations finger braiding cords. These can be made in round, square, or flat varieties and were very likely a source for decorative points we see in paintings.
Leather thong points are not the cheap leather lacing you find in modern craft shops. They used a tougher leather, often deer hide, in strips.
In almost all cases, the cords are tipped in a metal aglet, often of brass or silver. These serve the same function as the tips of modern shoelaces: they make it easier to thread them through the holes and keep the ends nice and neat. In addition, these aglets often served as decorations themselves.
Aglets or Chapes
The metal bits on the ends of the cord are called aglets or sometimes chapes. They are formed of a sheet of thin metal, cut into a sort of pie slice shape and then rolled into a cone. The freshly cut end of the cord is inserted into this cone and the whole thing is crimped, sewn, glued, or some combination of those.
Aglets are pretty simple to make but do require some time and dexterity. There is a great tutorial here. If you look around you can also find them for sale, usually (as of the moment I’m writing this) running between $0.50 and $5 each depending on design and material.
How to Make Nice Arming Points
Cords
I know a lot of modern fighters are going to want the easy way out, so here you go: Use 550 paracord and melt to ends into points. There. Done. Boring.
If you like or know someone who is interested, finger loop braids can be both useful and look fantastic. There is a great tutorial to get you started here.
For myself, I like to use a kind of cord that has been used by sailors for millennia: tarred hemp marline. This is a twisted hemp cord that has been impregnated with pine tar. I get mine from American Rope and Tar and I use their 6/1 4mm marline for most arming points. It is extremely high quality and smells wonderful.
How long to cut your arming point cords is up to you, but I usually find 14-18″ (35-46cm) works well. You might want longer ones if they will be decorative.
Wax
For showmakers wax (or cordwainers wax or cood or code or many other names), you can buy the modern version from bagpipe repair supply shops or traditional fly (fishing) tying supply shops. Occasionally, you might even find some among shoemakers supply shops. It is not that hard to make though and a little goes a long way.
After comparing recipes from all the historical accounts I could find (sadly, only going as far back as the 19th century), I have come up with the following: 11 parts rosin, 6 parts beeswax, and 1 part pine tar. DO NOT use your good cooking pans for this. Mix by weight into a disposable metal container like an old coffee tin or smallish tin pail. Warm by placing that into a larger pot of water and bringing it to a simmer. when it is liquid, mix with a stick and finally pour into a large bucket of cold water. It should solidify there before it hits the bottom. Let it sit for a few minutes as the insides will still be scolding hot. When cool enough, you should be able to warm it a little in your hands to form it into balls.
To use the wax, you’ll want a piece of leather to keep your fingers from being burned. Place the cord between the leather and the ball of wax and pull the cord through. With pressure, and pulling through fast, the cord will get a nice sticky layer of the stuff all over it. I’ve found 5-6 pulls is sufficient and any more does little.
Aglets
For aglets, I have 2 ways I use.
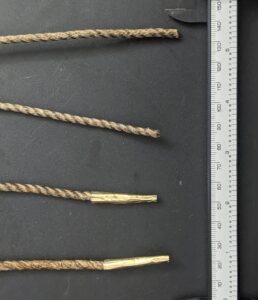
The easy way is modern, but looks fine at a distance. I found a crimper and aglets on Amazon. The aglets are modern and mass produced, but once in place look fine from 10-20 feet. The best part is they stay on!
But for the correct aglets, I usually buy mine in bulk whenever I can find them for a good price. I’ve made my own but I’m not great at it. I highly recommend the tutorial here and if this is something that interests you, there is a whole Facebook group dedicated to aglets here.
I attach my historical aglets like this: First, I cut the cord clean across. I then take a little wood glue and work it into the last inch or so of the cord, wiping off the excess. Let it dry. This makes the end stiff. Next, I’ll slide the aglet onto the tip as far as it goes and get it in there nice and tight. Sometimes, I’ll dab a bit of super glue onto the cord first. Once it is in there nice and tight, I’ll crimp it tight around the cord. Now days I usually use the crimper I mentioned above, but a pair of pliers works, even if the result is a little messy.
Let’s Get Knotty
There doesn’t seem to be a knot tutorial written back then for how to tie your arming points, but you can see the knots in some contemporary art. These give you a few possibilities:
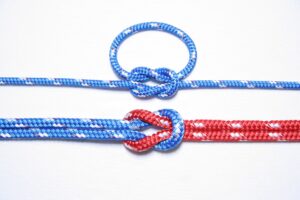
Square Knot (or Reef Knot): As shown in the sabaton point in an image above you can use a square knot. This is my prefered method for arming points that will bear weight and that I will need to untie after a fight. NB: A square knot is used because it is simple to untie. The process is called “capsizing” and involves pulling one end across the knot to loosen it all. I and others often frown on using a “granny knot” (a mis-tied square knot) because a granny knot does not capsize and is therefore much more difficult to untie when tight. PLEASE know the difference.
Single Loop Bow: With origins in clothing points, the single loop bow is one of the most commonly seen knots in armor illustrations. There has been much argument about the exact process, but I have found the best method is a “slipped granny knot”. You tie the initial overhand, like beginning to tie a square knot or tying your shoelaces, and then loop one end on itself to complete a granny knot but with an end and a loop. This allows the loose end of the loop to be pulled to release the knot. You will need to begin with uneven lengths and it takes some practice to end with the two ends of relatively equal length. I believe this is over all the best knot to use, but most people helping you into your armor won’t know it, so I tell them to use a square knot.
Doubled Single Loop: This is a lot like the single lop, but done on doubled cords. I believe it would be tied by taking the two ends and tying them in a slip knot with the ends forming the ends you pull to release the knot. This takes some dexterity and it is difficult to get the knot tight against the armor. It does look good though.
Double Loop: If you’re thinking about tying your shoes, this is the most common shoe tying way and can be seen in some illustrations as a knot used in armor points. This is also great for extra long, decorative points.
Surgeons’ Knot: This is a modern knot, made by passing the end under twice in the first half of a square knot. It tends to hold a little better if the cord tends to slip.
Water Knot: Like a Surgeons’ Knot, but you pass under twice both times. As above, but looks neater. (The name for this knot is debated. It is sometimes called the “academic surgeons knot” or “double reef knot”. There is a different knot also called a water knot.)
If you can only learn one knot…. Learn the Square Knot.
Attaching to the Arming Garment (Gambeson)
Today, we see people sewing leather tabs onto the gambeson. Historically speaking there is really only one way I have seen: A hole through the cloth.
Sewing a tab is simple: You sew three (!) sides of the leather to the cloth, leaving the bottom open. You can then stick your fingers into the open side and help fish the cord from one modern metal grommet to the other. A surprisingly large number of fighters today use this method. It seems simple and easy. If the tab rips off, sew it back on! Sure, you CAN use this method. I am not going to stop you.
But please let me introduce you to the historical method of making worked eyelets.
These were, like points in general, used both on clothing and on arming garments. The idea is simple: You work the cloth fibers apart to open a hole and then you use thread to reinforce it. This was used on clothing, armor, and ships’ sails. All of these use the same method.
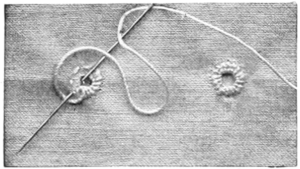
In essence, you use an awl or other pointy thing (a good pen works sometimes) to wiggle and work the fibers apart. You’re trying NOT to break them. Once you have a hole a little bigger than you need, you sew around the hole. Initially, you’d use a star pattern to maintain the hole and establish the outer ring, but from there, you sew tight stitches (either a running stitch or a buttonhole stitch) to make a full circle. When done, the hole goes completely through the gambeson. You make these in pairs and (using the aglet to find your way) lace the cord in one and out the other.
It takes a bit more work and if you get the location wrong, just make another. You can leave multiple eyelets in place. It’s OK. In the end you’ll be able to WASH your gambeson without having to re-sew the tabs every time or destroy them in the wash.
If you like, you can reenforce the eyelets with string or even a metal ring, but you really don’t need to. Here is one tutorial aimed at reinforced eyelets on sails. Here is another tutorial that I found helpful. It usually takes me about 15 minutes per eyelet.
