- On Arming Points and Knots
- Re-furbishing an Arming Sword Grip
- The Perils of New Armor
- Some Thoughts on Armor Selection
- Managing Heat While Wearing an Oven
- Diet
- Train Like a 15th Century Knight
- Alternative Workout….
- Helmet time
- Injuries are real…ly annoying.
- Rust Prevention for Armor – Revisited
- How to Wear Leg Armor
The question of how you’re supposed to wear leg armor is one I’ve heard debated ever since I began my journey into armored combat. The simple answer is, “The method that works best for you.” But that’s not so simple to figure out, so I’ll cover a few different answers and how and why they work.
The leg harness, whether made of plastic, leather, steel, titanium, or some combination like splint or brigantine, typically straps around the leg in a few places and then hangs at the top from some sort of suspension system. I’ll be talking here about a few of the more commonly seen suspension systems that I have seen.
Just a Belt
One of the first ways many new fighters will use for suspending their leg armor is just a thick, leather belt. Sometimes you’ll see a weight lifting belt used for this. It is super simple and you can find weight lifting belts at most decent sporting goods shops. It’s easy, but often rubs against the hips and can cause lower back pain because the leg armor pulls almost entirely from the front, causing the back muscles to be constantly engaged.
The Load Bearing Belt and Suspenders
Another of the first methods I saw in use and even tried for myself, is a load bearing belt and suspenders. This style is based roughly on the US Military ALICE load bearing system. It consists of a wide, often stiff belt with a set of suspenders (or braces for those of you on the other side of the Atlantic).
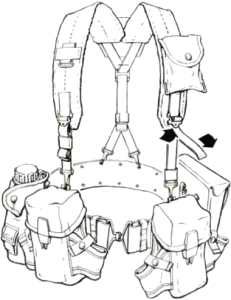
The original ALICE load bearing gear spread the weight of your gear around the belt and even on the suspender straps. It allowed a soldier to carry essentially a day or weekend pack with combat gear where it could be easily accessed.
I have seen some fighters use modern load bearing belts (like the kind American police use) and both stretchy and non-stretchy suspenders. I see this style used mostly by an older generation of SCA fighters or fighters who come from an SCA background. Many of them are veterans who are familiar with this style. For armored use, the pouches are removed and the leg armor laces to the belt.
The load bearing belt and suspenders option is perhaps the easiest to improvise at home and it can be useful, especially for people with especially narrow hips In general, though, you don’t want the leg armor to be supported by your shoulders if you can at all help it. Many people who use this method complain of back pain.
The Venerable “C-Belt”
Among bohurt fighters, this is universally the most common method of wearing leg armor. The “C-Belt” or “cuisses belt” (“C-belt” because many people seem to have trouble remembering the French word, its spelling, or pronunciation…) is a very wide, thick leather belt or corselet designed specifically to support leg armor. These are much more comfortable than a plain belt or even a weight belt and provides slightly better support.
A proper C-Belt is curved to be tighter at the top where it cinches inside the hips and wider at the base, where the belt flares into large tabs where the leg armor connects. These tabs usually have holes punched in them for laces or sometimes they have buckles connected if the leg harness connects with straps. With time and usage, the belt will form fit to the user’s waist and become a bit more comfortable.

Lendenier
We know the name and a few details, but not what they actually looked like. They were made by “pourpointiers” sometimes, by corsetieres sometimes,and even occasionally, belt makers. Essentially we think these were wide linen belts, usually quilted with padding, that tied in the back and could be used to support leg armor. They seem to have been shaped like a truncated cone, perhaps with tassets where the points for the cuisses attached.
These work just like a cloth C-belt but have a real historical basis. They were likely used from the origin of maille chausses right up through the mid 15th century. Most modern reproductions lace in front for convenience. They should fit tight like a corset above your hips. If you’re a bit rounded like me, you’ll end up with rolls above and below.
Ian Laspina, on his site, “Knight Errant”, reports a considerable amount of research he did on this item including a video and in that video, you can see his pattern to make your own.
Pourpoint (Waistcoat or vest)
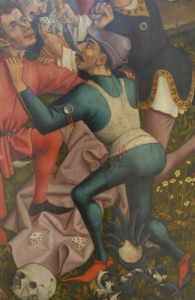
The pourpoint is essentially a sleeveless doublet, or a vest, with holes worked along the bottom edge to lace on your leg armor. This is more common among HEMA harnischfechten fighters and others who want to wear something historically accurate. There is ample evidence that pourpoints existed, but we see them supporting hosen (usually joined hosen) rather than armor. They are likely to have been made for hosen and using them for armor puts a lot of stress on the cloth. To fix this, many are made with tougher canvas.
In order for something like a pourpoint to work it needs to be tailored to be very tight at and immediately above the hips yet a little looser in the shoulders so that the wearer can still move and fight.
Historically, these are known for supporting your hosen but few records of them being used for armor. The image on the right shows a pourpoint vest with nothing attached to the lower points, but it looks like it is tailored like an arming coat (see below). Since hosen are already visible underneath, I would presume this pourpoint will be used to support his leg armor.
Attaching to the Gambeson
This is an idea that many have tried and it never lasts long. A typical gambeson is not fitted for bearing weight. Some who have tried this will reference the sources that show tied around the waist of the coat. My personal opinion on these is that they were used to lace the coat to the hosen, not the armor. Hosen don’t weigh much and just need something to keep them in place. Armor pulls harder.
When you point your leg armor to your gambeson, the weight inevitably ends up resting on your shoulders. Depending on the angles involved, your gambeson might act like “Chinese finger cuffs” and pull tightly around your torso in very uncomfortable ways. If you get past that, the weight is still on your shoulders and that will lead to all sorts of muscle pain and restricted mobility. Just skip this one.
Arming Cote, Arming Coat or Arming Doublet

There is a lot of speculation on this one and I’ve got a fair bit of experience to back up what I say here. In one historical account, an armored fighter “schal have noo schirte up on him but a dowbelet of ffustean lynyd with satene cutte full of hoolis . the dowbelet muste be strongeli boūdē there the poyntis muste be sette aboute the greet of the arme . and the b ste before and behynde and the gussetis of mayle muste be sowid un to the dowbelet in the bought of the arme . and undir the arme.” What’s that mean?
An arming coat is an under garment. No shirt is needed. It is a doublet, made of multiple layers, of fustian, a fabric a lot like denim or heavy canvas. It should be lined with (silk) satin and “cut full of holes” for the attachment of ties or “points”. It must be tightly fit around the body – the lower torso, so as to bear the weight on the hips, as evenly around as possible. The fit from the sternum to the low waist should fit like a corset, shaping your torso to make a smaller waist line than your hips. Above this point, it should allow full and complete movement. Ties are placed for maille “voiders” that patch the openings of the elbow and arm pit as well as on the outside of the upper arm to hang the arm harness.
I’ve used a number of arming coats and I can say they can be the best or worst things, depending on how they fit. The tailoring is essential and needs attention to detail. The arming coat must fit like a corset around the natural waist yet be loosely fit and a little roomy above that and especially in the shoulders. A well fit arming coat should not impede your flexibility in any way. They must be made with extremely strong cloth because the ties around the waist will support the leg harness and also the ties on the arms will support the arm harness. If it slides down past the hips, it is too loose in the waist. If it impedes your being able to rotate and bend your torso or swing your arms, it is too small in the top part. These are common problems. Most tailors today, tailor for a comfortable fit on modern bodies which are not hourglass waisted. Once you get the fit right though, the weight of the leg harness is supported by your hips and also your whole lower torso. If not, this is a nightmare to fight in.

I can only recommend one maker of arming cotes at this time: Quiver stock, in the UK. They understand how it needs to fit and they use extremely high quality materials and even hand finish the visible seams. Other places may make good ones, too, but Quiverstock is the only company I have experience with that makes them right.
Historically, this method was common from the second quarter of the 15th century onwards. There has been some speculation that foot soldiers used cuisses belts or lendeniers and mounted troops used arming coats, but my research seems to indicate it was more a case of when in history vs who. The belt/corset system is the earlier method. The arming coats is the later method.
I cannot stress enough how an arming coat must be tailored to fit you correctly. I hope to some day make a blog post about the proper fit in more detail, but suffice to say that a lendenier or arming coat properly worn WILL give you as much of an hourglass figure as your body will allow. This was the fashion in the 15th century.
Ties, Points, and Straps for Suspension
Once you’ve chosen a suspension method, you’ll need to connect the top of your cuisses (thigh armor) to your suspension system.
Where to attach is an important consideration. The ideal location is the point of rotation of your hip. This is usually off to the side but not all the way. Many systems use 2 sets – one on the side and one about 45 degrees to the outside front. You may need to experiment a little. Articulated knee armor will definitely tell you if the leg armor is not aligned with the suspension system. (It won’t bend without rubbing.) You’ll need to locate the end at the top of the cuisse and the corresponding end where it attaches to your suspension system.
Attaching a strap is fairly permanent as to the location, which makes it not the most ideal, but if you have the exact location you need, it makes it easier to attach and detach your leg armor. Typically, a buckle is mounted at the hip and a strap to the armor. Occasionally, people will add a metal hoop to allow the leather to bend and move with the leg. If you are sure you have the location(s) right, go for it.If you mess up, you’ll need to drill out the rivets and move to new holes…
Most people use cords (called “arming points”) of some sort to tie the leg harness on to the suspension system. Historically, points were tough cord about 12-24″ long with metal tips, like fancy shoelaces. The end is typically fed into one hole in the suspension system and out one adjacent to it. Sometimes, a set of 4 holes has the string going in one side bottom, out that side top, over to the other side, and then out the bottom. This leaves the two ends to lace through the corresponding holes at the top of the cuisses. Feed them out from the inside and tie in a knot.
Especially when using points, it is a good idea to use two sets on each leg, in case one breaks, loosens, or unties. I use one about 45 degrees outward and one more on the side of the hip. The side one pivots and the front is backup.
Arming Point Holes
For those who use arming points, I’ve seen the holes in cloth items done two ways. Among many bohurt fighters, I see leather tabs sewn on that have 2 holes in the middle. They are meant to be sewn onto a gambeson on three sides, leaving the bottom open to be able to route the string from one hole to the other in back. The other method is a “worked eyelet”. These are the more historical method and you can find tutorials on how to make them online.
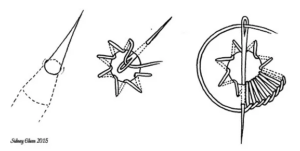
Seriously. Making worked eyelets isn’t that difficult. You’ll need a needle, thread, and an awl or other spike that has a gradual taper from a point to a little over 3/8″ in diameter. You can use a smaller one to starty and something like a pencil or pen to finish. It involved working the awl/spike/pen through the fabric layers slowly, and wiggling it in so as to not break any fibers. The fibers pushed out to the edges are where you’ll sew around. You then run a running stitch around that edge, binding it together in a star pattern, then around one or more times to fill in the gaps. There are tutorials here and here.
On the armor end of the points, you will see either holes through steel or through an attached piece of leather. Through leather, most of us just use a leather hole punch and leave it at that. Through metal, you’ll need to file the edges smooth so they don’t cut the cords that go through them. You can also add a softer metal grommet through a hole in a metal plate, but please do not use them in cloth. Metal grommets pull out too easily and modern metal grommets in cloth actually weaken the cloth a lot and are not recommended. They also were not invented till way after the historical period when your armor was designed.
Arming Points: Strings and Knots
The same document that I quoted above regarding arming coats also talks about how to make arming points. “the armynge poyntis muste be made of fyne twyne suche as men make stryngis for crossebowes and they muste be trussid small and poyntid as poyntis. Also they muste be wexid with cordeweneris coode . and than they woll neythir recche nor breke.” Essentially this says to use strong cord that doesn’t stretch, attach metal aglets to the ends, and pull the string through shoemaker’s wax (code).
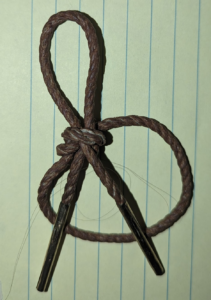
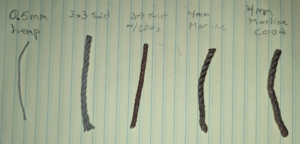
Basically, you’ll need a stout cord. I use tarred hemp marline for occasions I want to look historically accurate and plain 550# paracord when I’m in a hurry. I pull the hemp through some home made shoemakers wax. 550 cord can be melted with a lighter and formed into a point to feed through the holes easier. Anything that doesn’t melt like that will need a tip. I work wood glue into the ends of the hemp cord as soon as I cut it and let it dry. This works temporarily as soon as it dries. For most points, I crimp on metal shoelace aglets. If I need to be super accurate, I have hand made brass aglets, but they tend to be expensive, time consuming, and don’t stay on as well.
As for knots, there is evidence for the use of square knots, single loop bows, and double loop bows. From a practical standpoint, surgeons knots, water knots, and double knotted bows work well. There is a special knot for a single loop bow I’ve seen in a French book, but honestly, tying a double bow (just like shoe laces) and pulling one through works better for me. Adjust the length of each end so you end up with the ends even. Most often though, a “surgeon’s knot” works best. You tie it like a square knot, but you tuck under twice in the first half and once in the second half.
I’ll post a blog article specifically on arming points and knots at some time in the future.
A square knot or surgeon’s knot can be easily loosened by pulling one end across the knot – called “capsizing” in sailor terms. If you tied the wrong version – the granny knot – this won’t work.
Fit and Adjustments
Whenever you get new armor you’ll need to figure out how to fit it to you and this is where trial error, and experience come in handy. It might take a few tries before you get the perfect placement of your eyelets or the holes in the leather at the top of your cuisses. Some armorers pre-punch a lot more holes than you need, so you can move the ties around till they fit right.
One trick I use is to keep one tie along the front tendon that lifts your thigh. The other point god 30-45 degrees around, outward from there. The holes should line up with the cuisse and arming coat or lendenier vertically when standing.
To get the height right I sit down, and pull the laces till they are a little snug but not tight when my knee cops are in the right place. After tying the knots, I stand and walk around a little to get everything to settle in. Often I need to loosen the points just a little.
The idea is to keep messing with it till it feels the best and then stop. Mark the right holes in the leather atop the cuisses if you need to. Remember where everything goes in case you have someone helping you get dressed and you need to tell them what holes to lace through.
And that’s it!
If you have any questions, please send them to me either in a comment below or through the contact form.
